Blog Archives
Urban Farm Fanatic – We’re back from a long hiatus!
Low and Behold! I’m posting again!
Yes, tis true.. I’ve not posted in quite a while and for that, my apologies.
Life has a way of making certain things a priority.. for me.. that includes a variation of different jobs, financial instability and lastly a mass fish die off 😦
I guess you cannot be a true AP’er till you have a few of these kick you in the butt while learning the ropes. The last started right around the beginning of May, with my last fish finally kicking the bucket mid-June.
As with any concerned farmer, I tried a number of things to see about stopping the problem. I changed out the water, did a full tank cleaning, checked on my waters oxygen levels, I even tried ‘salting’ the fish a couple of times based on recommendations from some forums I routinely visit (for those not familiar with salting, essentially you dip a fresh water fish in a concentrated solution of salt water for a period of about 5 minutes, this is done to hopefully kill any parasites that might be effecting the fish as well as help in the health of their scales).
Alas, none of these items remedied the problem and I eventually lost my whole batch.
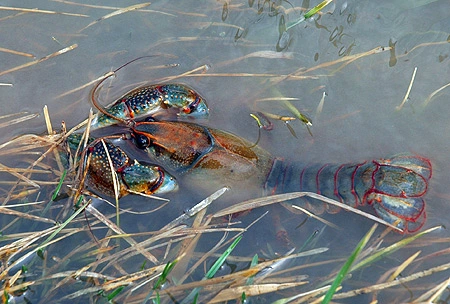
So, I decided to start on a new tack… fish out, crawdads in. I switched from using Talapia to Crawdads as my main supplier of fertilizer for my plants. I’m currently on finishing up my first month and so far so good! I’ve not had any die-offs and these little suckers do a grand job of keeping the tank clean!
Currently I’ve got about 10 in my system, with plans on adding about 20 more. I started with a small batch to see how they would fare. Water temps have been between 85-95 degrees.. which had me worried that the temps might be a shade too high. I also wanted to make sure I got the Ph levels at a range that was comfortable for the plants and mudbugs (now hovering at 6.9).
I’m also a shade late, but we decided on a replanting of a number of items in the grow beds. Most of what was there were mostly winter plants and the heat did not treat them well. So a clean sweep was decided upon.
Up next, I plan on finishing the last two of my grow beds and then switching from a hoop house to a more aesthetically pleasing Pergola to protect the plants.
Stay tuned! More posts to come 😉

Covering the Aquaponics Greenhouse – Lets Get Warm Again!
 For this edition of the build, it will come in two parts. This first part was essentially to get the shade cloth down and the opaque solar film up. Unfortunately I did this a bit too late with the recent cold snap and so some plants were lost due to frost. As this year is essentially a trial run of learning the ropes of AP, I’m now realizing what times of the year are best to make the transition from Summer to Winter. Obviously waiting till January was missing the ball by a fairly long shot. Totally on me 😦

So for this weekends project, got my buddy John over to my place (cause believe me you don’t want to tackle covering a greenhouse all by your lonesome) and we knocked out getting the sides attached with the film. As you can see the end frames are still needing to be trimmed up and attached properly, hence Part 2 😉
But for now, with the film secured from being blown off by

the wind and getting it tightened down fairly good, I should be able to get the end frames wrapped up by next weekend, while still being able to take advantage of the solar thermal properties of the film being put in place.
That point was proven about an hour after we had placed the film and got it cut to length. My friend John and I went inside and you could immediately notice a significant increase in temperature from the outside air. Today
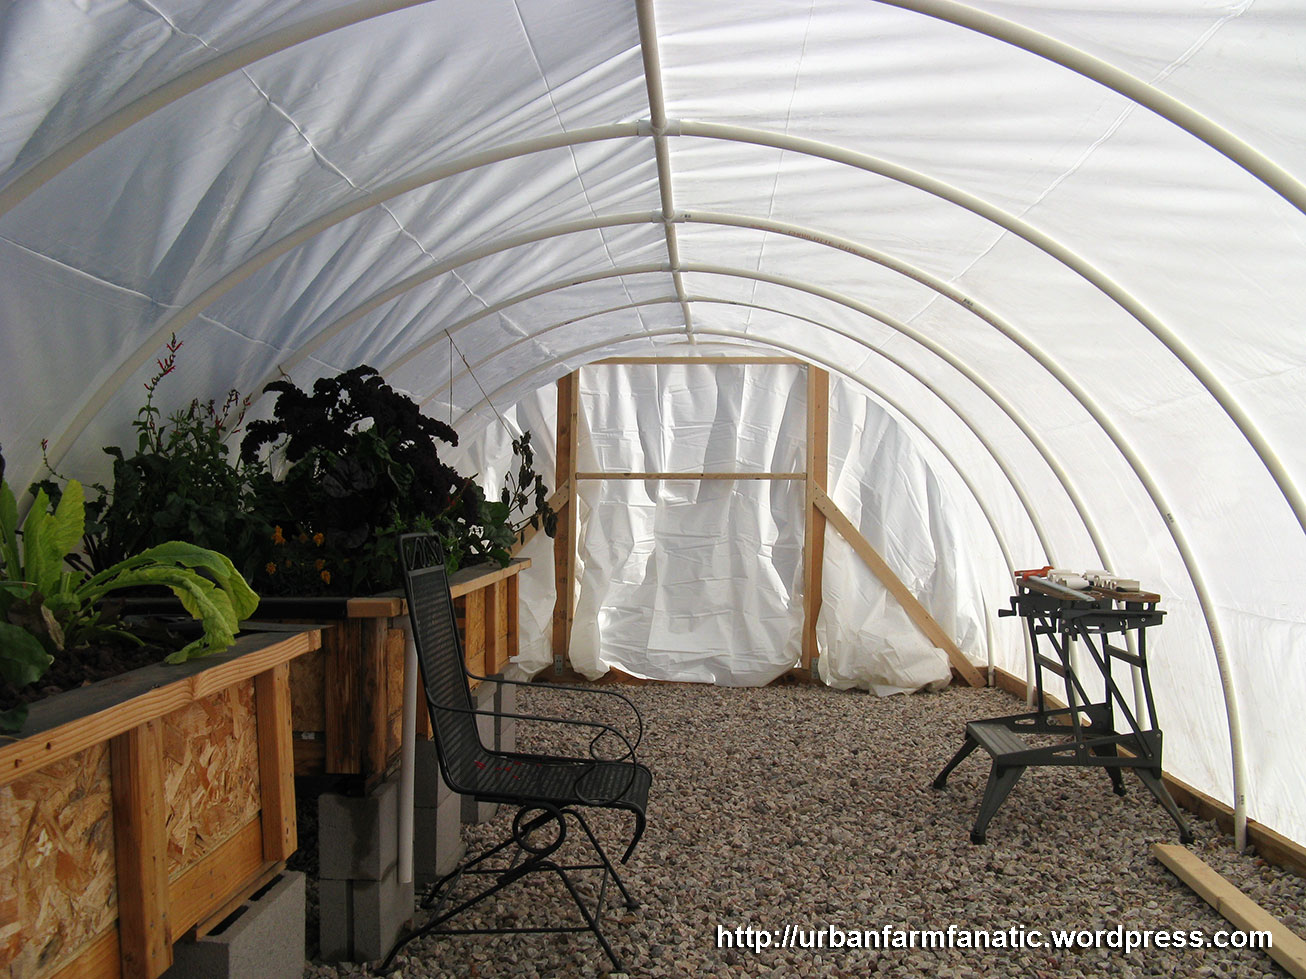
(Sunday) marks the first FULL day the film will be in place and I’m interested in seeing how well it will help to keep the water temperature up a bit for the fish.
As I’ve got other items on my plate for today, getting this post up is the next best thing to getting those end frames complete (which will come next weekend, so stay tuned for that update).
Aquaponic Bang for Your Hard Earned Dollar – Some Lessons I Learned w/my Build..
I’d say that as AP’ers the biggest factor in what we build (and for that matter maintain) comes down to two simple components, space & money. After going through my first build there were many things I’d liked to have known prior to my putting stuff together that would’ve made my progress a bit simpler and with less headaches (both in design and cost). So I feel that the best thing I can do is share those lessons with the community at large, in hopes that some of what I share will help those of you with your own builds.

SIZING
First get a good handle on the size of what you wish to build before buying a thing. This ultimately comes down to how much grow bed space your going to have overall. If you’re indoors, this is going to be small most likely, so determine the square footage of grow bed space, then that’ll determine what you need as far as the number of fish and finally the size of your tank.
For example, say you have a grow bed that is 3 feet by 5 feet by 1ft = 15 sq ft. With that you can determine the amount of fish you can have for that system. In this case a safe number that I used was 84% of 1 sq ft of grow bed space to 1 fish (so 15 sq ft x 0.84 = 12.6 rounded up for 13 fish). For that same number of fish, the size of your tank can be determined by roughly 2 sq ft of water per fish (this is at a minimum, the more water you can use in your system, the better, as this will help stabilize temps, nutrients, Ph, etc.) 13 fish = 26 gallons minimum (again, if you can provide a larger tank with the same number of fish, all the better for your system).
Now you may ask why I went with these figures? The answer lies in that as a beginner I wanted a few things right off the bat, stability with my system, as well as knowing I’ll have a good ratio of plants to the amount of fish poo. If you put in too many fish, they’ll produce too much poo and the fish essentially die from toxicity because there are not enough plants/bacteria to help clean the water. Some will argue my findings and that’s fine, but I’m basing this off my own system and have had great results so far with headaches being kept to a minimum. As the fish mature, they will produce more poo over the same period of time.. food for thought.
 REPEAT PURCHASES
These are going to be items that will continue to be used in your system for the duration of your use of it. Fish food, seaweed extract (nutrient booster), testing kits, sometimes starter plants (if you decide you don’t wish to start from seed). All of these items will be ongoing, so if you find these items with a low overall cost prior to your build, you will save money over the long run. Plus consistency in the products you use will not throw a potential kink in your system down the road that is unforseen.
ONE TIME PURCHASES
 PUMPS
PUMPS
The pump I chose was an Aquascape’s Aquaforce 2700 Solids Handling Pond Pump which pumps 2700 gallons per minute (on level ground). I over-sized my pump in order to take advantage of the fact that this can still pump out a great deal of water even after it is pumped vertically by nearly 14 feet (flow volume decreases considerably over various heights for all pumps, so be sure to check this when determining your own designs). For me I wanted something powerful, with a good head height, had a built in screen to keep the fish out and one that didn’t chug down electricity like a demon (pump is rated at 147 watts continuous). This pump also gives me the opportunity to add additional grow beds down the road.
For your own pumps, determine a good value based on water volume needing to be moved, head height (vertical flow of water over distance) and the wattage rating and of course how that all relates to price.
 HEATERS
Here is another place where you can build using scrap materials and put together your own solar water heaters to heat your tanks throughout the day (mainly for outdoor AP setups, though it can be used inside if you provide a good enough pump to get the water from the SWH to your tank).
For alternative heaters, I went with EHEIM Jager Aquarium Thermostat Heater 300W. I did this primarily because I did not think to plan ahead and build my own SWH system for my tank. These heaters are rated up to 260 gallons each, I bought two for my 840 gallon tank. Turns out, you’re more likely to save a good deal of money by buying multiple smaller heaters than one gargantuan one. Plus, they can be spaced throughout the tank to heat multiple areas at the same time. Each has its own temperature regulator, so when reached they will automatically turn off. These are VERY important for those in colder climates. Mine are huge to be sure, but you can find heaters sized to fit your particular tank setups. The main negative remark I have for these is that they will eat a bit into your electricity bill. If you can build/plan your own SWH setup before hand, you will definitely start saving from day one!
BUILDING MATERIALS FOR GROW BEDS/FLOATING RAFTS/NFT
These are another area where real savings can be had!
- Always buy used or recycled materials. Craigslist and FreeCycle were two places I went to find materials from people that were just throwing the stuff out! This can be wood, PVC, cement mix and other building products. Start here and stock pile the materials you will need for your build ahead of time.
- For anything that cannot be ‘salvaged’, again shop around online (out of state, nix the tax, save 5-10%).
- Another recommendation is that if you have to build with new materials, look at speaking to a contractor to buy the materials for you. These guys are able to get materials ‘at cost/wholesale’ versus retail. So you arrange a fee for them to use their shopping power to your advantage. The savings here can be as much as 50%
A WORD ON TANKS
This is a special note to those who plan to build outdoors and make their own tanks… USE THE GROUND!!! i.e. don’t build a tank.. dig one. If I had it all over to do again, I would’ve saved a considerable amount of time, money and sweat if I had just dug a hole (possibly lined it with concrete) and then just laid a pond liner in said hole. Much easier to do, much less time spent, much cheaper option.
A FINAL WORD
So as with all things AP, its a learning process. I’m still learning myself, there is much more to share.. and I feel that all of us have an innate need to be a bit more self sufficient in our lives.
I WISH YOU GOOD LUCK IN YOUR OWN ENDEAVORS!
Drop me a line if you have questions. I’ll do my best to answer them 😉
Future Updates to the Aquaponics Greenhouse..
I always figured that once I got to the growing stage of my build, things might taper off on the project front. As things currently stand, I’m still needing to add about 4-6 more grow beds. But I’m also thinking about other items that will be needing to be addressed within the next few months.
SOLAR WATER HEATER


The first item that has come up on the radar has to do with keeping my fish tanks/grow bed water at a higher temperature during the cooler fall/winter months coming up. I thank my friend John for bringing this idea to light.
My buddy happened upon a system which works simply by running water through black hosing along a fence line and then returning that water to the tank in some fashion (see example above – not my system by the way).
Normally, Talapia can handle rather colder water temps without issue to their survival. What does crop up is their ability to grow. Optimum temperatures for Talapia would be an 83-87F degree water temperature. At this temperature, the fish are in their ‘happy zone’, which means they eat the most and grow the fastest at this temperature range. Currently my water temps are now hovering between 75-78F degrees. So a noticeable change of nearly 10 degrees has occurred just in the past month. I had thought burying the tank would offset this much of a change (which it does, but it just progresses more slowly), but I didn’t take into account (or at least didn’t put much concern into) the flow of the water from the tank through the plumbing and grow beds. These actually act to help heat or cool the water depending on surrounding temps.
The main expense is limited to the tubing and connectors and then running the lines in an area that can collect the suns rays throughout most of the day. This system also has the added element that the cinder block upon which it is laying can also act as thermal mass storing heat to some degree. So even after the sun sets or gets shaded over by clouds, there is still heating going on to the fluid flowing withing the lines.
FISH TANK & GREENHOUSE LIGHTING
 Another project I’d like to tackle in the near future has to do with setting up some type of lighting for both the fish tank and the greenhouse itself. For both I’d ideally want them to be running on a 12 volt system running off a battery and using a solar panel(s).
For these items, I’m most likely going to purchase them over the counter, versus trying to build them from scratch myself. My electrical know-how is limited at best and I’d rather not electrocute my fish 😉
I did make an attempt at adding lighting into the tank using a rope light, but found that it created too much reflection on the waters surface to see the fish. It will need to be waterproof and submerged to be truly effective at seeing what the fish are up to at night.
For the greenhouse my thought is either using rope lighting or possibly LED Christmas lights running off an inverter. This will keep the setup simple and since its modular I can add/remove strings as needed and place them along the PVC ribs of the greenhouse itself. I can also setup a switching element near the entry way to turn them on or off.
Grow Bed Build – Bed #2 Complete!
 Got this one done in double-quick time!
Since building the first, I now know what lengths are needed without trial and error, plus I pre-cut some of the supports for the second bed when I was completing the first. Makes the work go by a whole lot faster 🙂
Now that the first two beds are completed, I can move on to getting them setup, lined, leveled and plumbed. I’ll then add additional beds in sets of two going forward till all 8 beds are completed.  This should be interesting as now I’m having to pre-plan a bit with regards to how all the plumbing will work together (not just for the first two going forward, but all eight down the line).
Starting off, I’ll have 48 sq ft of growing space. Upon completion of all the beds this will give me 192 sq ft of grow bed area to work with! Not too shabby! I have also considered the possibility for expansion and so if down the road I’m feeling spunky, I can expand the width of the greenhouse to accommodate another 50% increase in grow bed space. That will be phase two. I’d also have to incorporate a sump tank into the setup to help keep my fish tank levels from dropping. So this idea is a bit of a ways down the road.
 I’m getting quite excited now!
I should be ready to start cycling the system come mid-August.
A slight delay as I’ll be doing a bit of traveling in the coming weeks.
Progress is good! I’m happy.. and more updates to come! 🙂
Fanatic Aquaponic Grow Bed Build – Bed #1 Complete!
 Now that the tank is finally in the ground, I can now move on to the grow bed building portion of the greenhouse.
As before I’m sticking with the reclaimed lumber I had from the shed tear-down. Expenses here included screws, pond liner, paint and a few drill bits (go through them like butter).
As with everything in this build, I’m making it up as I go along.. i.e. I have no set plans to work from, I’m just building as I go based on a rough sketch I did when this whole ball of wax got started 😉
 Originally I had planned on making the bed size 8Lx4Wx1H, but revised that just a bit to 8Lx3Wx1H. This reasoning came when I decided to take a look at how much space such a grow bed would take within the greenhouse itself. At four feet in width, it became apparent that my reach across the entire width of the grow bed would become difficult as I would only have access to the bed from 3 sides versus 4 (since that side will butt up against the outer wall of the hoop house). This was confirmed when during mock-up the wife mentioned as much for herself.
 So, now the final tally will be 24 sq ft per grow bed versus 32. I’ve also decided to go solely with grow beds versus a split between beds and an NFT raft setup. Mosquitoes are a big problem and I’d just as soon avoid that fiasco all together.
Next up will be painting the growbed to help it stand up to the elements and so that it looks a bit better aesthetically. I’ve got several more of these to build, but now that I’ve been able to get through the first, I now know what I need to put together from a parts list standpoint and can pre-cut everything before hand going forward to save time.
 Once I’ve got the first beds painting completed I’ll then start working on initially placing them in the hoop house and getting it leveled, lined and plumbed (this is another little bit of build I’m looking forward to with the PVC.. as I’ve never done it before, it should make it very interesting) 😉
Some items of note that came up after a good discussion with a fellow AP’er.. the ratio of fish to grow bed capacity came up. Now what’s considered a safe ratio is 1:1, that being 1 fish to 1 square foot of grow bed. He noted that he originally started off with 50 fingerlings and would eventually have two grow beds totaling about 48 sq ft of growing space. Problem was he never got to building the second bed due to family constraints. Of the 50 he started off with he’s now down to about 30 due to not properly screening off his pump. 20 or so poor little fish got sucked up into his grow bed and that was that.
 Even so, at 30 fish he is now noticing his ammonia levels getting high. After screening for anymore dead fish, reducing the amount of feed given to the fish and his ammonia still on the high side.. the deduction is that there is just not enough biofiltration going on with the one grow bed to take care of all 30 fish (which within the span of 6 weeks went from 1 inch to nearly 5 inches!.. bigger fish = more poo = more ammonia). He is now working on plans for a second bed.
With that in mind I’m going to start with even more of a buffer and limit it to about 20 fish per grow bed.. or about 1:1.2 = 1 fish to about 1.2 sq ft of grow bed (roughly 160 fish at maximum capacity). Ultimately the main plan is to keep the system as stable as possible. I’d rather er on the side of caution then have to restart a new cycle on a system. Anyway, that’s my 2 cents.
More updates to come!
Fanatically Happy Day! – The Aquaponic Tank is in the Hole!!!
 As it has been a while since my last update, I wanted to quickly go over the reasons for my delay in getting our large fish tank (840 gallon capacity) into the ground…
Originally the idea I had in mind was to get 3 extra people together and coordinate a time to have them come over to lend me their muscle lowing the tank in the hole with some large rope. Problem was I could never get everyone together on the same day. Family plans and being out of town were the main reasons. This then made me research hiring some movers to come out and help me get the tank in the ground.  Well that plan was also a no-go as I was repeatedly getting quotes somewhere between $240-290 dollars to have them come out and put in an hours worth of work (uh uh). What finally ended up happening was that my friend John, who has many cogs and gears whirring through his head at any given time, helped devise a game plan that involved the use of 1 inch PVC to act as rollers underneath the tank to get it from my porch to the other end of the yard. He also help devise a sketched idea of using an a-frame gantry and a winch that we used to span over the hole. My job was essentially getting the needed materials together and building it.
 So with this new plan in mind, I paid a visit to a local Harbor Freight and got my hands on a hand winch and straps with hooks. I then was able to piece the A-frame portion together with some 2×4’s, OSB board and some 3/8″ lag screws. For the gantry portion going over the hole I had to purchase three lengths of 2x4x10’s (as all I had was 8ft lengths at home which were too short). These lengths I then screwed together with deck screws and then mounted the winch in the center.
 These eventually showed me a few issues that I needed to overcome. One, the hand winch is the cheapest unit I could find at Harbor Freight (rated for 2000 pounds, the tank I figured was pushing about 6-800 pounds).. this winch had originally been placed on the bottom of the gantry, but that proved to not be a workable idea since the design of the winch did not allow for a cleared area of the cable and hook away from the hand crank, essentially eliminating my ability to crank it up and down. The solution was to detach and re-attach the unit on the side versus the bottom of the 2x4x10’s.
  Because of this I need to add a 4th, shorter piece of 2×4 so that I could accommodate the entire footprint of the winch on the side. Immediately I could see that this would cause some serious torque happening on the overhanging gantry, essentially setting it up for failure by twisting to the point of falling off the A-frame support. To negate this, I added a 2×6 piece at the end overhanging the cinderblock wall on the other side, giving the gantry some much needed leverage.
 In the end the whole system was a one-time use setup, so as long as it did the job of getting the tank in the hole, that’s all I cared about.. and… it worked! We needed to constantly work on maneuvering the tank into the hole cause I made the size of that hole only inches of clearance on each side (this did require some modification on our part with a pick ax and shovel before hand as we found a few areas that would not clear the tank.. my bad).
 The last aspect of this endeavor was that we were doing it in Summer in Phoenix. Even though the sun was not directly on us at the time of the lowering. It was still reading 108-109 outside. Yeah, we’re a crazy bunch for doing this in that heat, but it was either that or wait till September to get it done when the temps drop… uuuuh NOPE!
So, to say I’m ecstatic about the tank finally being in the hole is an understatement!
 The next steps of my progress will be to back fill the areas around the tank, add in the pond liner, start in on the end frames for the greenhouse and get started on building at least 2 grow beds to get the system started on cycling.
Obviously I’ve still a ways to go, but now I’m no longer bottlenecked going forward! WOOT!
BIG, BIG, BIG thanks to my buddy John for all his help on this project.. a true friend to the end!
Farming/Gardens – Aquaponics – Making the Most Out of a Small Space
Efficiency should be your number 1 goal when putting together a system of growing, whether that is for growing fruits/veggies or livestock. The more complications you add into that system, the more there will be chances for it to go wrong.
Most Urban Farming methods rely on systems that can take advantage of small spaces simply because that is the hand people are dealt. Usually somewhere indoors, maybe a patio or if lucky a small yard. So when I went researching for a means to create such a system for my own urban dwelling, the choices got narrowed down real quick. I had looked at wicking beds, hydroponics, traditional dirt farming, raised planter boxes, pot gardens, etc. Ultimately though one technique came through with the most bang for the real estate buck.. Aquaponics. Essentially the creation of a small ecosystem utilizing plants, fish and bacteria colonies that works in a closed loop.
The beauty of this system comes from its many benefits. .
 It’s scale-able: You can put a system together with 1 goldfish in a 1 gallon bowl, 1 pump and a small planter bed to grow your greens.. all the way to a commercial based setup that can feed thousands.
Water usage: A system that can provide soluble nutrients to your plants while utilizing less than 1/10th of the water needed for traditional soil based farming of the same grow area.
 Elimination of ‘Killers’: No pesticides, herbicides, fertilizers, or weed killers are needed.
 No Weeding: As mentioned in #3, weed killer is not required because few, if any, weeds will show up in an AP system. The ones that do slip through, you simply grab, pull gently, and the entire plant, along with its roots are removed never to regenerate again.
 Stop growing horizontal: Vertical tower growing is becoming more popular by the day.. by taking advantage of vertical empty space, you can take a just a few square feet and expand your grow space by a factor of six or more (depending on ceiling height).
Eliminate bending: Don’t know about you, but constantly having to haunch over to tend to a garden was fine when I was a kid.. as I got older though, the bod just didn’t have the same flexibility or spring in my step. AP offers you the ability to set the height of your grow beds, thereby eliminating much of the need to bend over.
Growing time is reduced: You can essentially grow the same foods you do now in traditional dirt farming in 1/3 to 1/2 the time. A constant supply of nutrients, water and oxygen is supplied to the roots of your plants in an AP setup. This helps the plant improve both in size, nutrient density and how quickly it can be harvested.
 You can add fish into your diet: Talapia, Perch, Catfish, Crayfish, Barumundi.. the list can go on and on, but you can essentially provide a stock of your own fish for consumption.
There are many more benefits to this type of system. All together you’re maybe looking at 2 to 3 moving parts.. the main pump, the air-stones pump and maybe a backup pump. The rest of the system relies on gravity and what are known as auto-siphons that help the water fill and drain from a grow bed (these have no moving parts but rely on air to create an open/closed drain). There are many different styles and types of Aquaponics that can be referenced for your own setup, should you decide that’s a direction you want to go.
But again, the decision of what type of growing style you go with is a personal choice. I’m simply describing something that has many benefits for the small space dweller.
Its not a perfect system, there are a few drawbacks like not being able to grow many root based vegetables. But the community supporting it is vast and growing everyday. New ideas and development may one day solve some of those drawbacks.
Fanatic Inspiration #1..
What initially got my motivation going was a visit to what has been coined ‘The Garden Pool‘ down in Mesa, Arizona.
Took a tour of this families wonderful idea to convert their backyard pool into a greenhouse. The creativity here is absolutely 1st rate! They have chickens, fish (talapia), pygmy goats and utilize a number of growing techniques to produce food for their family of four. They have been interviewed by local news media and have even been filmed for both the Discovery and History channels!
Took some of my own vids. Granted need to work on my videography skills and the sound is not as good as it could be, but its still great to pick up on all the questions that were tossed out!
Part 1
Part 2
Part 3
Part 4
Urban Farm Fanatic Item #2 – Aquaponics Greenhouse Anyone?
Original Hoop Siteplan Mock-up.
Shed shown at bottom.
Some things I had to work out in my head with regards to building a greenhouse were its size and location. However the other consideration I wanted to mull over was the ‘type’ of greenhouse. Not only how it was built, but how the food within was to be grown.
“Come again?”, you may say.. but surprisingly there are many different means at ones disposal to grow fruits and veggies. Ultimately my decision ended with me wanting to put together a Hoop Greenhouse with the garden grown Aquaponically. If you’re new to these concepts, the previous links will provide additional details for each.
I decided on a hoop because it is the least expensive structure to build, is considered non-permanent, therefore it does not require permitting, and is relatively easy to design and setup. Originally I planned on a 12×50, but eventually reduced that to 12×40 because of the yards space requirements and was able to squeeze in the same amount of grow area by simply eliminating a staging area on one end.

Placed on the northern side of our yard with an East/West layout to maximize overall sunlight capture.
I began by laying out the four corners of the structure and then buying a minimal amount of supplies to get an idea of the overall height and interior dimensions.
As you can see in this first photo, I was also having to deal with the previous tenants, i.e. some bushes that I would need to evict from their locations. The hoop staging actually turned out to be a great idea! I originally was planning on using 3/4 inch PVC in 20 foot lengths to create the arches.. a couple of small problems though.. 1. there was no way that was going to fit into the car, 2. the 3/4 inch PVC looked a bit flimsy. So instead I bought 1 inch diameter PVC in 10 foot lengths with a 45 degree joiner connecting the two ends together (this also created a nice aesthetic). This worked out phenomenally! The base of each PVC is slid over a pre-cut piece of 3 foot rebar that I drove halfway into the ground with a sledge hammer. The other half is left exposed and you simply bend and slide the PVC over it.

Bushes Be Gone!
Next up was to tackle those bushes! These little bad boys have been here the better part of a decade, so getting them out I believed was going to take multiple weekends, turns out it took me all of about 5 hours of manual labor. The ground was wet from a previous nights rainstorm and that made digging that much easier. The roots were the real labor intensive aspect. Hit those repeatedly with the end of the shovel and my body weight. Eventually, physics won the day and I was able to get all the bushes out!
The next stage is to get the rest of my materials for this build (I’ll post those on this post once I’ve finalized the list). I’ve got to get some landscape fabric that needs to go down and then about a 2-3 inch based of rip-rap to help discourage burrowing animals and provide a nice walking surface with good drainage. After that its the rest of the rebar, PVC, and some 2×4 lumber to build the end frames for the door and ventilation.
